

Getting a fresh gel mani feels like a total win. Those nails stay glossy and chip-free for weeks. But eventually, that regrowth starts showing. You might feel tempted to just peel it off. Stop right there because peeling ruins your natural nail beds. You need to learn how to remove gel nail polish at home the right way. This guide will walk you through every single step. We will keep your nails strong and healthy. You can totally do this yourself with the right tools.
Understanding the Science of Gel Polish
Gel polish is not like your regular old nail lacquer. It uses special chemicals called photo-initiators. These react under a UV or LED lamp to harden. This process is called polymerization. It creates a tough bond that lasts for weeks. Because the bond is so strong, it does not just wipe away. You cannot use a quick swipe of regular remover. You need a specific process to break those chemical chains.
Regular nail polish remover usually has a lot of water. It is meant to dissolve thin layers of air-dried paint. Gel polish is a cross-linked polymer. It acts more like a plastic shield on your finger. This shield is porous but very tough. Knowing this helps you understand why soaking is required. You are literally waiting for a solvent to crawl inside those chains. If you rush, you end up ripping your keratin cells.
- Chemical Structure: Gel is a polymer that creates a hard, plastic-like shield.
- Bonding Process: The polish cures under UV/LED light to bond with the nail plate.
- Resistance: Unlike regular polish, it does not dissolve with water-based removers.
- Risk Factor: Forcing the bond to break manually causes severe nail trauma.
Improper removal is the main cause of nail damage. Many people think the gel itself ruins their nails. That is usually a myth. The damage happens when you scrape or peel. Peeling pulls off the top layer of your nail plate. This leads to white spots and thinning. It makes your nails feel like paper. We want to avoid that at all costs. Your natural nails deserve some real TLC.
You also need to know what kind of gel you have. Soft gel is the most common type. It is often called soak-off gel. This type dissolves easily with pure acetone. Hard gel or builder gel is different. It is much thicker and stronger. Most hard gels do not soak off at all. You have to file them down with a professional e-file. Check with your nail tech if you are unsure. This guide focuses on soft soak-off gels.
Essential Supplies and Workspace Preparation
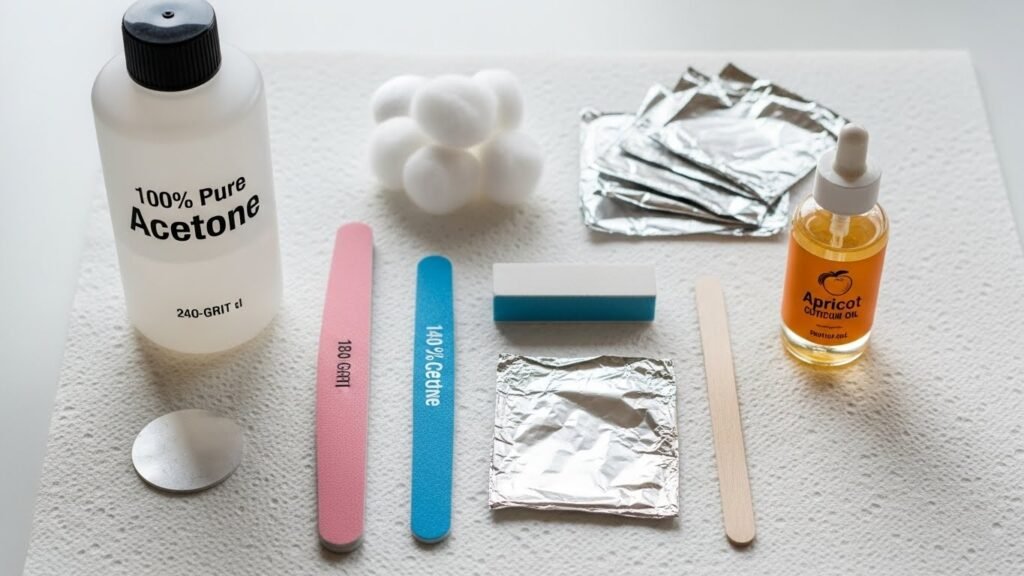
Before you start, you need to set up your station. Acetone is a very strong solvent. It can eat through the finish on your kitchen table. It can also melt some types of plastic. Always lay down thick paper towels. These will protect your furniture from spills. Make sure you are in a well-ventilated area. The fumes from pure acetone can be quite strong. Open a window or turn on a fan.
The most important tool is 100% pure acetone. Do not buy the “strengthening” or “moisturizing” removers. Those are too weak for gel. You need the full-strength stuff to break the bond. You will also need a nail file. A 180-grit file is perfect for the top layer. For finishing, a 240-grit buffer works best. These different grits help you control how much you remove.
- 100% Pure Acetone: This is non-negotiable for breaking down gel polymers.
- Nail Files: You need both a 180-grit for the surface and a 240-grit for smoothing.
- Cotton Supplies: Use cotton balls for maximum liquid retention.
- Aluminum Foil: Pre-cut into 3-inch squares to wrap each finger.
- Removal Tools: Have an orangewood stick or a gentle cuticle pusher ready.
- Protective Oil: Cuticle oil or petroleum jelly to shield your skin.
You will need cotton to hold the acetone. Cotton balls are great because they hold a lot of liquid. Cotton rounds or lint-free pads also work well. You need something to wrap the cotton. Tin foil is the classic choice. Cut them into 3-inch squares before you start. You will also need a tool to lift the gel. An orangewood stick is the safest option. A metal cuticle pusher works if you are very gentle.
Hydration is the final piece of the puzzle. Acetone dries out your skin and nails. You must have a good cuticle oil ready. Essie apricot cuticle oil is a fan favorite. You could also use jojoba or vitamin E oil. A timer is also helpful. It stops you from checking your nails early. Having everything ready prevents a mess. You do not want to go digging through drawers with foil on your fingers.
Pre-Removal Steps for Maximum Efficiency
Trimming and Shaping
The first thing you should do is trim your nails. If your mani is old, you likely have some length. Use a sharp nail clipper to remove the extra length. This reduces the surface area you have to soak. Smaller surface area means the acetone works faster. It also prevents the gel from cracking in weird places. Trim them down to your desired natural length.
Breaking the Seal
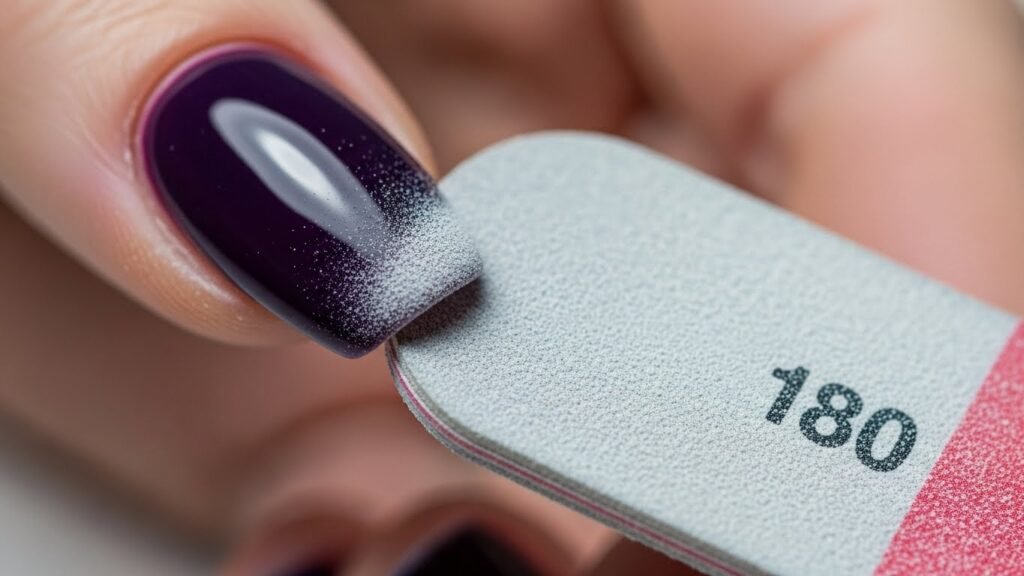
Gel polish has a non-porous top coat. This layer is designed to be waterproof and shiny. If you do not break this seal, the acetone cannot get in. Take your 180-grit nail file. Gently file the surface of every nail. You are not trying to file off the color. You just want to remove the shine. Stop once the nail looks dull and dusty.
- The Goal: Remove only the shiny top layer to expose the porous color layer.
- Technique: Use light pressure and a back-and-forth motion.
- Identification: The nail should look chalky or dusty when the seal is broken.
- Warning: Stop immediately if you see or feel your natural nail plate.
Protecting the Surrounding Skin
Acetone is a paint stripper. It is very harsh on your cuticles. It can make your skin turn white and crusty. You should create a hydrating barrier. Apply a thick layer of cuticle oil around the nail. You can even use petroleum jelly. This coats the skin so the acetone does not touch it. Be careful not to get oil on the nail surface. Oil can block the acetone from doing its job.
The Professional Soak-Off Method (The Foil Method)
Saturating the Cotton
Now it is time for the actual removal. Take a cotton ball and soak it in pure acetone. It should be dripping wet but not a total mess. Place the wet cotton directly on top of the nail. Make sure it covers the entire gel surface. If the cotton is too dry, the gel will not soften. If it is too small, the edges will stay stuck.
The Wrapping Technique
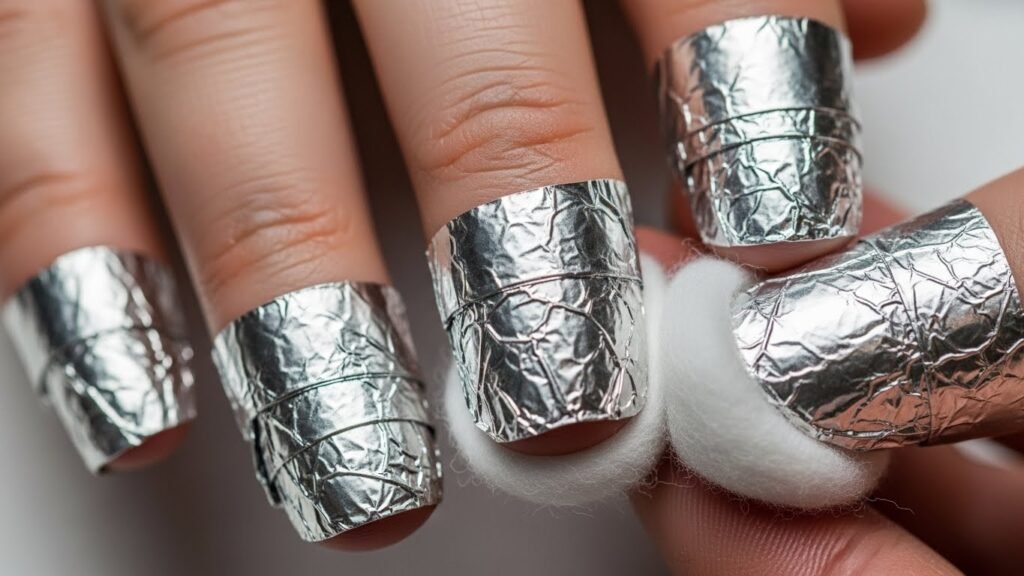
Wrap a 3-inch square of tin foil around the finger. You want to create an airtight seal. Pinch the top of the foil to lock it in place. The foil keeps the acetone from evaporating. It also uses your body heat to speed up the reaction. Work on your non-dominant hand first. It is much easier to wrap your second hand when the first is done.
- Step 1: Place the soaked cotton directly over the filed nail surface.
- Step 2: Position the finger in the center of the foil square.
- Step 3: Fold the bottom of the foil up over the fingertip.
- Step 4: Wrap the sides tightly around the finger like a burrito.
- Step 5: Squeeze the tip to ensure the cotton is pressed firmly against the gel.
The Waiting Game
Once all ten fingers are wrapped, start your timer. You need to wait at least 10 to 15 minutes. This is the hardest part of the process. Do not be tempted to peek. Every time you open the foil, the acetone evaporates. The gel will start to harden again immediately. Just sit back and watch a show. Let the chemicals do the heavy lifting for you.
Alternative Removal Methods and Tools
Soak-Off Clips and Pre-Made Wraps
If you hate fiddling with tin foil, try clips. Plastic soak-off clips are a game-changer. They clamp down on the cotton and hold it tight. They are reusable and much easier to put on. You can also buy pre-made wraps. These come with the cotton pad already attached. They are great for travel or quick fixes. Both options are much less messy than foil.
Alternatives for Sensitive Skin
Some people have very sensitive skin. If acetone causes a rash, you have options. You can find acetone-free removers. These are usually based on soy or other solvents. They are much gentler but take much longer. You might have to soak for 30 minutes instead of 15. Always check the label to see if it works on gel. Some natural brands are surprisingly effective.
- Soy-Based Removers: Natural, non-toxic, but require significantly more time.
- Conditioning Removers: Contain glycerin to offset the drying effect of solvents.
- Steam-Off Machines: Warm the acetone to speed up the process with less skin contact.
The Chemical-Free Filing Method
You can technically remove gel by filing alone. This is called the manual method. You use a medium-grit file to slowly thin the gel. You must be extremely careful not to hit the natural nail. This method is best if you have a very thick layer of builder gel. Most pros use an electric drill for this. If you do it at home, go very slow. Stop when you see the base coat.
The Removal and Cleanup Phase
Checking for Progress

After 15 minutes, pull off one foil wrap. Look at the gel polish. It should look raised and flaky. It might even look like it is bubbling off the nail. If the gel still looks smooth and hard, put the foil back on. Give it another 5 minutes. Every brand of gel is different. Some are stubborn and need more time to dissolve.
Gently Lifting the Gel
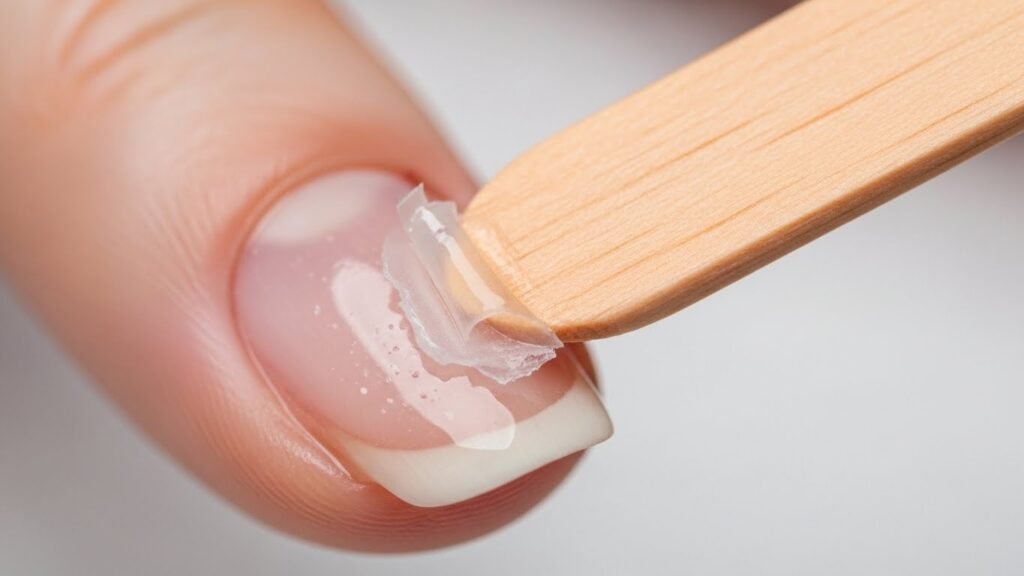
Use your orangewood stick to push the gel. Always push from the cuticle toward the tip of the nail. The gel should crumble away with almost no pressure. If you have to scrape hard, stop immediately. It means the bond is still too strong. Re-wrap the nail for a bit longer. Forcing it will rip your keratin cells.
- The Flake Test: The gel should look like it is lifting or curling at the edges.
- Tool Angle: Hold your stick at a 45-degree angle to the nail.
- Motion: Use gentle, short strokes rather than one long scrape.
- Resistance: If it sticks, do not force it; re-wrap for another 5 minutes.
The Importance of the One-at-a-Time Rule
Only remove one foil wrap at a time. If you take them all off at once, the air hits the gel. The gel will re-adhere to your nail plate in seconds. Work through the removal on one finger entirely. Then move to the next. This ensures the gel stays soft until you are ready to push it off. It keeps the process clean and easy.
Refining and Smoothing the Natural Nail
Removing Residue
Once the bulk of the gel is gone, you might see clear patches. This is usually the base coat. It often stays stuck even after the color is gone. Use a fine-grit buffer to gently smooth these spots. Do not use a heavy file here. You only want to remove the leftover residue. Your natural nail should start to look clean and matte.
Shaping the Natural Nail
Now that the gel is gone, you can see your real nails. Use a file to refine the shape. Check for any snags or tiny tears. Smoothing the edges prevents your nails from catching on clothes. A clean shape makes your hands look polished even without color. Take your time to get the edges perfectly smooth.
Essential Post-Removal Care and Recovery
Immediate Rehydration
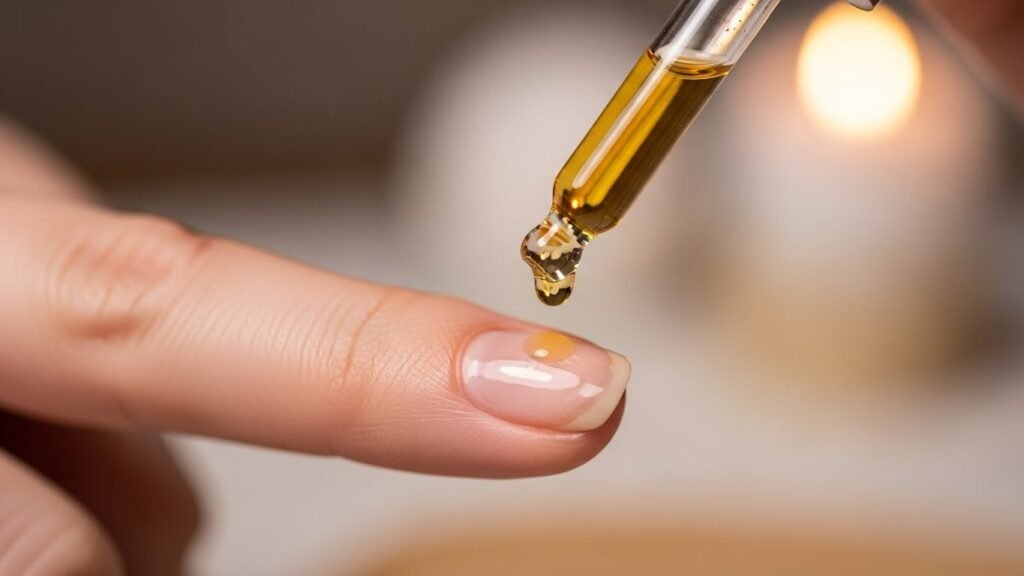
Your nails will look white and dry right now. This is because acetone removes all the natural oils. You need to replenish that moisture immediately. Apply a generous amount of cuticle oil. Massage it into the nail plate and the surrounding skin. This helps the keratin cells lay flat again. It also prevents hangnails from forming.
- Cuticle Oil: Use daily to maintain flexibility in the nail plate.
- Hand Cream: Apply after every wash to rebuild the skin’s moisture barrier.
- Night Treatment: Use a thick balm and cotton gloves for deep repair.
Strengthening Treatments
If your nails feel a bit bendy, use a hardener. Products like Essie Hard to Resist are great for this. They create a protective layer while your nails recover. Look for treatments that mention “damage repair.” These often contain proteins that bond to your nail. It acts like a temporary shield against breakage.
The Importance of a Nail Break
Your nails need to breathe sometimes. Constant gel wear can block the natural flow of oils. Try to go “naked” for a few days. This allows the nail plate to rehydrate naturally. It also lets you monitor the health of your nail bed. If you see deep ridges or thinning, wait longer before the next mani. Healthy nails are the best foundation for great polish.
Troubleshooting Common Removal Disasters
The Gel Won’t Budge
Sometimes the gel stays stuck no matter what. This usually happens if the polish was over-cured. It can also happen if you used a hard gel by mistake. If 20 minutes of soaking does nothing, do not keep soaking. Your skin will get too irritated. Instead, gently file the top layer down some more. Then try a fresh soak with warm acetone.
Dealing with Thin Nails
If your nails feel like paper, you might have over-filed. Stop all chemical treatments immediately. Use a heavy hand cream and lots of oil. Keep your nails short so they do not snap. It takes about 3 to 6 months for a nail to grow out completely. Be patient while the damaged part moves to the tip.
- Symptom: Nails feel tender or “hot” when exposed to water.
- Symptom: Visible red patches on the nail bed.
- Solution: Avoid all polish and use protein-rich repair serums.
- Solution: Keep nails filed very short to prevent further peeling.
Allergic Reactions
Some people develop an allergy to gel chemicals. This is often called HEMA sensitivity. If your fingers itch or get red after removal, take note. It could be the acetone or the gel itself. If you see tiny blisters, stop using gel at home. Consult a doctor or a pro nail tech. Safety always comes first in beauty.
Pro Tips for Your Next Application
- Use a high-quality base coat. This acts as a buffer between the gel and your nail.
- Avoid the cuticles. When applying gel, leave a tiny gap. This makes removal much easier because the edges won’t be trapped.
- Don’t over-cure. Follow the timing on your lamp exactly. Over-curing makes the gel way harder to remove later.
- Hydrate daily. Using cuticle oil every day keeps the gel flexible. Flexible gel is less likely to chip or lift.
- Store your tools properly. Keep your acetone in a cool, dark place. Clean your metal tools with alcohol after every use.
Summary Checklist for Home Removal
- Check the type of gel. Make sure it is a soak-off formula.
- Gather all supplies. Acetone, foil, cotton, and files are must-haves.
- Protect your workspace. Lay down paper towels to prevent damage.
- File the shine off. Break that top coat seal completely.
- Soak for 15 minutes. Use tin foil to create an airtight seal.
- Push, don’t scrape. Gently remove the softened flakes.
- Oil it up. Restore moisture to your nails and skin.
Learning how to remove gel nail polish at home is a great skill. It saves you money and keeps your nails healthy. Just remember that patience is key. Never rush the soaking process. Treat your nails with kindness, and they will stay strong. Now you are ready for your next beautiful manicure!
FAQs
Can I remove gel polish with a steam-off machine?
Steam-off machines are a modern alternative to the foil method. These devices warm the acetone, creating a vapor that penetrates the gel layers more quickly. While they can be faster and less messy, you must still file the top coat first to allow the steam to reach the color layers.
Is it safe to use a metal scraper instead of a wooden stick?
Metal scrapers are effective but require a very light hand. Because the nail plate is softened from the acetone soak, a metal tool can easily gouge the natural nail if too much pressure is applied. If you are a beginner, stick to orangewood sticks to minimize the risk of accidental thinning.
Why does the acetone feel cold or tingly during the soak?
Acetone evaporates very rapidly, which creates a cooling sensation on the skin. A slight tingling is normal due to the chemical drying out the surface oils. However, if you feel an intense burning or sharp pain, you may have a small cut or a skin sensitivity and should remove the wraps immediately.
How do I remove gel polish if I ran out of aluminum foil?
If you are out of foil, you can use plastic kitchen wrap (cling wrap) to secure the cotton balls. The goal is to create an airtight seal to prevent the acetone from evaporating. Alternatively, you can soak your fingertips directly in a small bowl of acetone, though this is much harsher on the surrounding skin.
Can I use a hair dryer to speed up the process?
Applying gentle heat can indeed accelerate the chemical breakdown of the gel. You can use a hair dryer on a low, warm setting over your foiled fingers for a few minutes. This warms the acetone and helps it penetrate the polymer chains faster, often shaving a few minutes off the total soak time.
Does the brand of gel polish affect how hard it is to remove?
Yes, different brands use different formulas for their base and top coats. Some “professional only” brands are designed for extreme longevity and may require a full 20 minutes of soaking. Inexpensive DIY kits found online sometimes contain higher levels of plasticizers that take longer to dissolve than high-end salon brands.
Why is my gel polish coming off in chunks instead of flakes?
If the polish comes off in large, hard chunks, it usually means the acetone didn’t penetrate deeply enough or the soak time was too short. Flaky, soft residue is the goal. If it feels chunky and stubborn, you likely need to file the surface more aggressively next time to let the solvent in.
Can I remove gel polish using only hot water and soap?
No, hot water and soap cannot break the chemical bonds of cured gel polish. While soaking in hot water might cause the gel to lift slightly at the edges, pulling it off will inevitably tear away the top layers of your natural nail. Only a chemical solvent like acetone can safely dissolve the bond.
Is it okay to use 70% isopropyl alcohol for removal?
Alcohol is excellent for removing the “tacky” inhibition layer after curing a manicure, but it will not dissolve cured gel polish. It is not a strong enough solvent to break down the cross-linked polymers. You must use 100% pure acetone for a successful soak-off.
What should I do if the gel is bonded to a cracked nail?
If your natural nail has a crack or a break underneath the gel, proceed with extreme caution. The acetone can seep into the crack and cause significant stinging. It is often best to keep the nail as short as possible and avoid aggressive scraping near the break to prevent the crack from traveling further down the nail bed.
Can I use a sugar scrub after removal to help my nails?
A sugar scrub is a great way to exfoliate the dry skin around the cuticles after the acetone has been washed off. However, avoid scrubbing the actual nail plate if it feels thin or sensitive. Follow the scrub with a heavy moisturizer or oil to lock in hydration.
How can I tell the difference between gel and acrylic during removal?
Acrylic is much thicker and harder than gel. During a soak-off, acrylic turns into a gummy, soft paste that needs to be scraped off layer by layer. Gel typically flakes or curls up away from the nail. If the product isn’t budging after 20 minutes, it might be a hard gel or acrylic.
Is it normal for my nails to look white or chalky after removal?
Yes, this chalky appearance is simply extreme dehydration. The acetone strips away every trace of natural oil from the keratin. This is not permanent damage and will disappear as soon as you apply cuticle oil or a high-quality hand cream.
Can I reuse the cotton balls for the second hand?
It is best to use fresh cotton balls for each hand. Once a cotton ball has been used, it absorbs the dissolved gel residue and loses its ability to hold fresh acetone effectively. Using fresh supplies ensures the highest concentration of solvent is hitting the nail.
Should I buff my nails before applying a new set of gels?
You should very lightly buff the surface to remove any leftover base coat, but do not over-buff. Thinning the nail plate through excessive buffing makes the next removal process even more damaging. A gentle “shine removal” is all that is needed for the next set to adhere.
Can I use a peel-off base coat under my gel?
Yes, peel-off base coats designed for gel are a great option for people who change their color frequently. They allow you to pop the gel off without acetone. However, they usually only last 5 to 7 days before the edges start to lift on their own.
Does the color of the gel affect removal time?
Darker colors, especially those with heavy pigments like deep red, black, or navy, can sometimes take a few minutes longer to soak off. Glitters and shimmers also tend to be more stubborn because the glitter particles create a physical barrier that the acetone has to work around.
What is the “Double Bag” removal method?
This involves putting acetone-soaked paper towels in a small Ziploc bag, placing your hand inside, and then submerging that bag into a bowl of warm water. The heat from the water accelerates the acetone without the mess of foil. It is a very fast method but can be very drying for the skin.
Can I use olive oil if I don’t have cuticle oil?
Absolutely. Olive oil, coconut oil, or even avocado oil are excellent natural alternatives to commercial cuticle oils. They contain the fatty acids necessary to rehydrate the skin and nail plate after the harsh chemical exposure of the removal process.
How do I dispose of the leftover acetone and foils?
Acetone is flammable, so you should let the used cotton balls and foils air dry before tossing them in the trash. Never pour large amounts of acetone down the sink, as it can damage PVC pipes and is harmful to the water system. Keep the trash can away from heat sources.