Discovering how to remove eyelash glue safely is a total game-changer for your beauty routine. Taking off those lashes shouldn’t feel like a chore or a scary task. This guide shows you exactly how to protect your eyes while looking fresh. You will learn every trick in the book for a clean finish.
Understanding Eyelash Glue and Adhesives
Knowing what is in your lash adhesive helps you pick the right removal path. Most glues are made to stay put through wind and tears. Understanding these formulas makes the dissolving process much easier for everyone. You want to break that bond without hurting your natural fringe.
The Role of Lash Adhesive
Lash adhesive acts like a tiny bridge between your natural lash and the extension. It creates a super strong bond that is meant to last for weeks. This glue must be tough enough to handle oils and water. Removing it requires a strategic plan to avoid any sudden tugging.
The Chemistry of Eyelash Adhesives
Most pro-grade glues use a chemical called cyanoacrylate to get the job done. This ingredient dries fast and holds onto surfaces with incredible strength. It is the same stuff found in many powerful household glues. You need a specific solvent to melt this chemical bond safely.
Common Ingredients and Additives
- Cyanoacrylate is the main star that provides the instant hold you love.
- Carbon Black is often added to make the glue blend with dark lashes.
- Formaldehyde might be present in small amounts in some cheaper adhesive formulas.
- Stabilizers keep the glue from hardening inside the bottle before you use it.
Professional vs. DIY Adhesives
Professional extension glue is much stronger than the stuff used for strip lashes. DIY cluster bonders usually sit somewhere in the middle of that strength scale. Strip lash glue is often latex-based and meant for just one day. Professional glue is medical-grade and requires a much more serious removal approach.
Why Adhesives Can Be Dangerous
Using the wrong glue or removal method can lead to nasty skin burns. Chemical irritation is common if the adhesive touches your actual eyeball. Some people develop sudden allergies to the ingredients over a long time. Always check your labels to ensure you aren’t using industrial-strength products.
Shelf Life and Storage
Eyelash glue does not stay fresh forever and can go bad quickly. Most bottles only last about a month once you open them. Improper storage in heat or light makes the glue gummy and weird. Old glue makes the removal process much harder and more painful.
The Importance of Proper Removal
Learning how to remove eyelash glue correctly saves your natural beauty. Rushing this process is the fastest way to lose your own lashes. A patient approach ensures your lids stay healthy and look great. You want to avoid any long-term damage to your hair follicles.
Protecting Your Natural Lashes
Your natural lashes are delicate and need a lot of love. Pulling on extensions can lead to a condition called traction alopecia. This is when hair stops growing because the follicle was pulled too hard. Safe removal keeps your natural lash line full and healthy-looking.
Maintaining Lid Health
Leaving glue residue on your lids can clog up your tiny pores. This leads to irritation and a condition known as blepharitis. Clean lids are less likely to get itchy or red after removal. Proper hygiene keeps your eyes looking bright and awake every day.
The “Never Pull” Rule
- Never yank on your lashes even if they feel loose or wonky.
- Mechanical force is the biggest enemy of your natural lash health.
- Wait for it to dissolve completely before you try to slide them off.
- Patience pays off by keeping your real lashes attached to your lids.
The Lash Growth Cycle
It is totally normal to see a few natural lashes fall out. Your lashes grow in cycles and shed naturally every single day. Sometimes they just happen to fall out while you are removing extensions. Don’t freak out unless you see large clumps coming out at once.
Knowing When to See a Professional
Sometimes a home removal job just isn’t going to cut it. If the glue feels like cement, stop what you are doing immediately. A certified technician has the right tools to save your natural lashes. It is better to spend a little money than to lose hair.
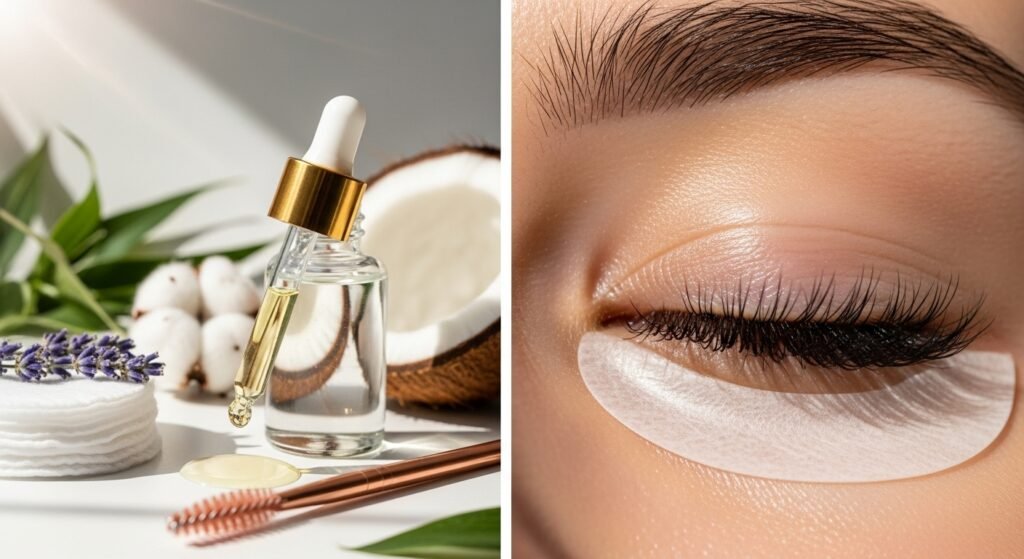
Essential Tools and Products for Glue Removal
Having the right gear makes knowing how to remove eyelash glue easy. You don’t need a professional kit to get great results at home. Most of these items are probably sitting in your bathroom right now. Grab your supplies before you start to keep things moving smoothly.
Solvents and Dissolvers
Specialized removers are made to target the specific chemicals in lash glue. These solvents are the fastest way to get the job done right. Gel-based removers are great because they don’t run into your eyes easily. They work by breaking the molecular bond of the strong adhesive.
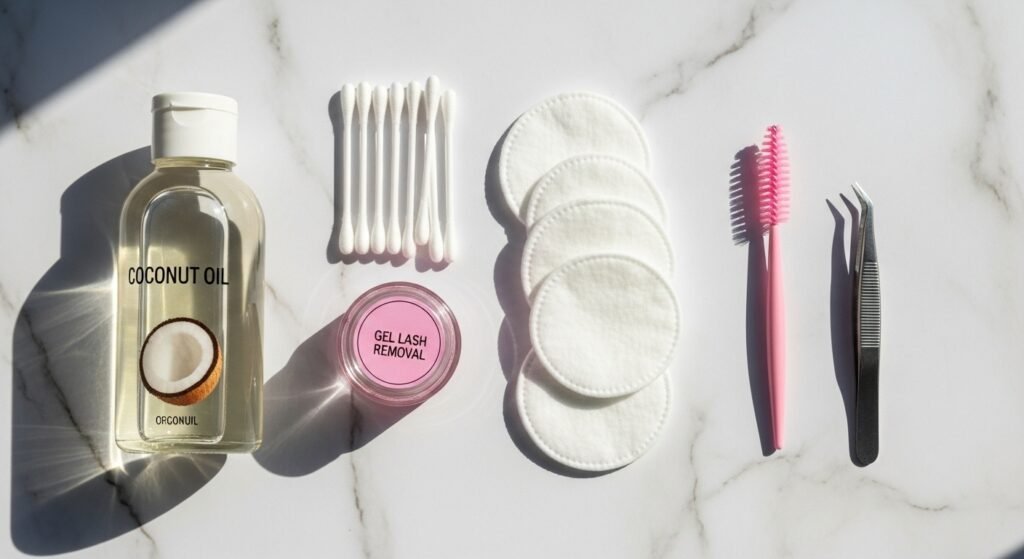
Household Oils
- Coconut oil is a fan favorite because it smells amazing and works.
- Olive oil is super heavy and can penetrate even the toughest glue.
- Baby oil is very gentle and perfect for people with sensitive skin.
- Mineral oil works quickly but you must wash it off very well.
Cleansing Agents
Oil-based makeup removers are specifically designed to tackle waterproof products. Cleansing balms are also fantastic for melting away glue and makeup. These products help lubricate the area so lashes slide right off. Look for formulas that are safe for the sensitive eye area.
Applicators
You need the right tools to apply your remover with total precision. Cotton pads are perfect for soaking the entire eye area at once. Cotton swabs or Q-tips let you target the specific lash line. Lip wands or micro-brushes are even better for tiny, detailed spots.
Finishing Tools
- Tweezers help you grab the tiny edges of the lashes gently.
- Spoolies are great for brushing through to see what is loose.
- Clean towels should be used to pat your face dry afterward.
- Micro-brushes allow you to apply gel remover without making a mess.
Protective Barriers
Using a bit of Vaseline on the skin can protect your eyelids. You can also use under-eye pads to catch any dripping remover. This prevents the delicate skin from getting red or irritated during removal. Protection is key when you are using strong chemical solvents.
Soothing Agents
After the lashes are gone, your skin might feel a bit tight. A hydrating eye cream can help calm any redness or warmth. Mild cleansers ensure that no oily residue stays on your face. Keeping the area moisturized helps your natural lashes stay very strong.
Method: Using Professional Glue Dissolvers (Bond Breakers)
Professional dissolvers are the “big guns” of the lash removal world. They are formulated to act fast on medical-grade lash adhesives. Using them correctly ensures you don’t end up with stinging eyes. This method is usually the most effective for long-wear extensions.
Selecting the Right Remover
Gel removers are often safer for beginners than liquid versions. The thick texture stays exactly where you put it on the lash. Liquid bond breakers are very fast but can run into the eye. Choose a product that matches the type of glue you used.
Cream vs. Gel vs. Liquid Removers
- Cream removers are the thickest and safest for very sensitive eyes.
- Gel removers offer a great balance of speed and control for users.
- Liquid removers work almost instantly but require a very steady hand.
- Bond breakers are often sold with specific DIY lash extension kits.
Step-by-Step Professional Application
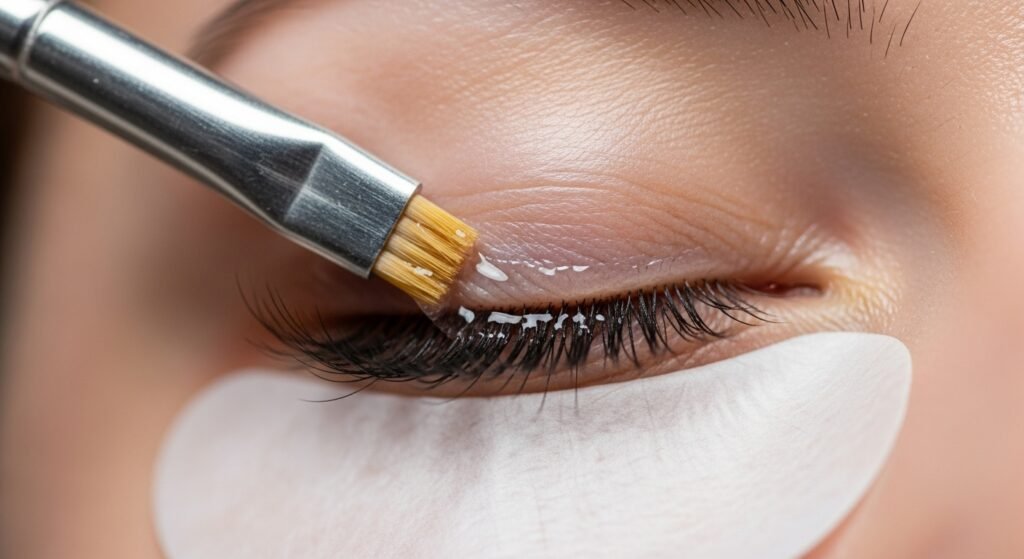
Start by dipping your micro-brush or wand into the remover gel. Carefully coat the top of the lash line where the glue is. Make sure to get the underside of the lashes as well. Keep your eyes closed tight so nothing gets inside the lid.
Optimal Wait Times
You have to let the product do the hard work for you. Most professional gels need about three to five minutes to work. Liquid versions might only need thirty to sixty seconds of time. Don’t rush this part or you will end up pulling.
The Release Technique
Once the time is up, use a spoolie to gently brush. The lashes should start to wiggle and slide off easily. If they don’t move, apply a tiny bit more and wait. Use a clean cotton swab to wipe away the dissolved glue.
Method: Using Oil-Based Cleansers and Makeup Removers
This is the most common way to handle how to remove eyelash glue. It is usually very safe and uses products you already own. The oil works by slowly softening the hard glue bonds. It is a great method for strip lashes or clusters.
Breaking the Adhesive Bond
Oil-based products are natural enemies of most eyelash glue formulas. The oil molecules get between the glue and the lash. This makes the adhesive lose its grip on your natural hair. It is a gentle process that doesn’t require harsh scrubbing.
Biphasic vs. Pure Oil Removers
Biphasic removers have two layers that you shake to mix up. They are less greasy than pure oils but still very effective. Pure oils like coconut are heavier and break down glue faster. Choose the one that feels best on your specific skin type.
The Soaking Technique
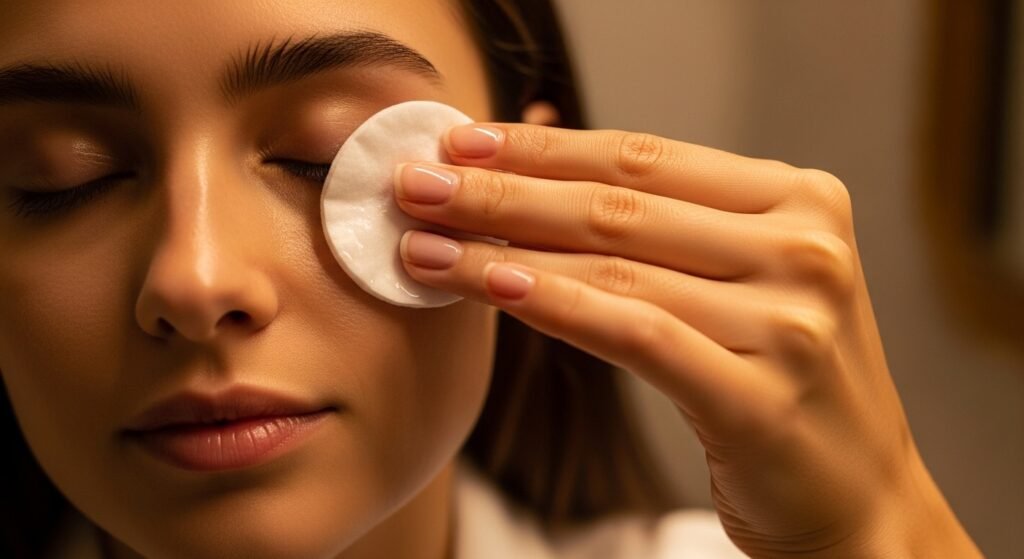
Soak a cotton pad until it is dripping with your remover. Close your eye and press the pad against your lashes. Hold it there for at least a full sixty seconds. This allows the liquid to really get into the glue.
The Wipe-Down Process
- Wipe downward slowly from the lid toward the lash tips.
- Use light pressure so you don’t irritate your delicate eyelid skin.
- Check the pad to see if the lashes are coming off.
- Repeat the process if you still feel some glue holding on tight.
Cleaning the Residue
After the lashes are off, there is often a sticky film. Dip a cotton swab in remover and detail the lash line. This gets the tiny bits of glue hiding between your lashes. Clean skin is less likely to break out or itch.
Method: The Natural Oil Approach (Coconut, Olive, and Baby Oil)
Using natural oils is a great way to be kind to yourself. These oils are usually free of harsh perfumes or chemicals. They nourish your lashes while they work to remove the glue. It is the most affordable method for most people today.
Benefits of Natural Oils
Natural oils are often packed with vitamins that help hair grow. They are very unlikely to cause a bad skin reaction. You can find these oils in almost any grocery store kitchen. They are much cheaper than buying fancy professional lash removers.
The Comedogenic Factor
Some oils can clog your pores if you have oily skin. Coconut oil is great but might cause breakouts for some people. If you are prone to acne, try using mineral oil instead. Always wash your face thoroughly after using any heavy oil.
Saturation Method
Dip a cotton swab directly into your oil of choice. Run it along the lash line until the area is saturated. Make sure the oil is touching the actual glue spots. You want the lashes to look “wet” with the oil.
Softening the Glue
Natural oils take a little longer to work than chemicals. Give the oil at least five to ten minutes to sit. You can even watch a short video while you wait. The longer it sits, the easier the removal will be.
Manual Removal
Use your fingers or a pair of tweezers to lift gently. The lashes should slide off with absolutely zero resistance now. If you have to pull, the glue isn’t ready yet. Apply more oil and give it another five minutes.
Method: Steaming Off the Glue

Steam is a secret weapon for loosening up tough lash adhesive. The warmth helps soften the glue so it releases its grip. It is a relaxing way to start your lash removal routine. Most people find this method very soothing for their skin.
The Science of Steam
Heat and moisture work together to expand the glue molecules. This creates tiny gaps in the bond of the adhesive. Once the glue is warm, it is much easier to dissolve. Steam prep makes every other removal method work twice as fast.
Technique 1: The Steam Bowl
Fill a large bowl with steaming hot (not boiling) water. Place your face over the bowl at a safe distance. Drape a large towel over your head to trap steam. Stay there for ten to fifteen minutes for best results.
Technique 2: The Hot Shower
Take a long, hot shower and let the bathroom get misty. Don’t put your face directly under the heavy water stream. The humidity alone will start to weaken the lash glue. It is a great way to multi-task your beauty routine.
Technique 3: Facial Steamers
- Commercial steamers provide a steady and safe flow of warm mist.
- Keep your distance to avoid getting a steam burn on skin.
- Close your eyes to let the steam really hit the lashes.
- Use for five minutes to get the adhesive ready for removal.
Essential Oil Infusion
You can add a drop of lavender oil to your water. This makes the whole process feel like a fancy spa. Eucalyptus can help clear your nose while you steam your face. Just make sure the oils don’t get into your eyes.
The Post-Steam Step
After steaming, the glue will be very soft and gummy. This is the perfect time to apply your oil or remover. The product will sink in much deeper than on cold glue. You will notice the lashes coming off much more easily now.
Method: Specialized Techniques for Removing Glue from the Skin
Sometimes the lashes are gone but the glue stays behind. This can look like gray or white flakes on your lids. It feels itchy and can be annoying to look at. These tips help you get that skin perfectly smooth again.
Dealing with Stuck Residue
Stuck residue is usually caused by using too much glue. It can be trapped in your natural lash roots. Don’t use your fingernails to scratch at these sticky spots. Use a gentle dissolving approach to protect your skin barrier.
The Vaseline Trick
Apply a tiny dab of Vaseline to the glue spots. Let it sit for about five minutes while you relax. The petroleum jelly breaks down the sticky bits of glue. Wipe it away with a clean cloth or cotton pad.
Cleansing Balms
Cleansing balms are like thick oils that stay in place. Massage a small amount over your closed eyelid very gently. The friction and the oils will melt the glue away. This is one of the most comfortable ways to clean skin.
Micellar Water for Sensitive Skin
Micellar water is great for picking up tiny leftover particles. It uses tiny micelles to grab oil and dirt effortlessly. It is less greasy than pure oils and feels very fresh. Use it as a final rinse to ensure everything is gone.
Common Mistakes to Avoid During Removal
Even if you know how to remove eyelash glue, mistakes happen. Avoiding these blunders will save you from a lot of pain. Most lash damage comes from people being in a big rush. Take your time and treat your eyes with total respect.
Using Sharp Objects
- Never use needles to pick at glue stuck in your lashes.
- Safety pins are extremely dangerous to have near your open eyes.
- Keep scissors away from your lash line during the removal process.
- Stick to soft tools like cotton swabs and professional lash brushes.
Over-scrubbing
Scrubbing too hard can cause micro-tears in your eyelid skin. This leads to redness, swelling, and a stinging sensation later. Be as gentle as you would be with a baby. Let the chemicals or oils do the heavy lifting.
Mixing Too Many Products
Don’t use three different removers at the exact same time. Some chemicals don’t play nice together and can cause reactions. Pick one method and stick with it until you finish. If it doesn’t work, wash your face before trying another.
Forcing Stubborn Clusters
If one lash cluster is holding on, do not pull it. This usually means there is a large glob of glue. Apply a concentrated amount of remover just to that spot. Wait another few minutes until it is ready to drop.
Safety Precautions and Irritation Management
Eye safety is the most important part of this whole guide. Your vision is precious and needs to be protected always. Most accidents are 100% preventable with a little extra care. Follow these rules to keep your peepers sparkling and safe.
The 24-Hour Patch Test
Always test a new remover on your wrist first. Wait a full day to see if your skin reacts. This is the only way to know if you are allergic. It is much better to have a red wrist than eyes.
Managing Irritation
If your eyes start to burn, stop what you are doing. Flush your eyes with cool, clean water immediately for minutes. Do not rub your eyes if they feel very itchy. Use a cold compress to bring down any sudden swelling.
Avoiding Harsh Chemicals
- Acetone is for nails and should never touch your face.
- Nail polish remover can cause permanent damage to your cornea.
- Rubbing alcohol is too drying and harsh for eye skin.
- Stay with products labeled specifically for use around the eyes.
Hand Hygiene
Always wash your hands before you touch your face. Your hands carry bacteria that can cause eye infections. Use soap and warm water to get them totally clean. Clean tools are just as important as clean hands.
Eye Safety 101
Keep your eyes tightly shut while applying any remover gel. If you are doing it yourself, do one eye. This lets you see what you are doing clearly. Never try to remove lashes while you are driving.
Post-Removal Care and Lash Recovery
After you learn how to remove eyelash glue, you need aftercare. Your lashes have been through a lot during this time. Taking care of them now ensures they stay very thick. Give your eyes the “spa treatment” they truly deserve today.
Deep Cleansing
Use a mild, sudsy cleanser to wash your entire face. This removes any leftover oil that might cause eye blurry. Make sure to rinse the lash line very well. Pat your skin dry with a very soft towel.
Hydration
The skin around your eyes is the thinnest on your body. Apply a rich eye cream to keep it looking young. Hydration helps soothe any minor irritation from the removal process. Use your ring finger to dab it on gently.
The Recovery Period
- Wait 24 hours before you put on any new makeup.
- Avoid new lashes for at least a day or two.
- Let your skin breathe to prevent any clogged hair follicles.
- Give your eyes a break from all heavy beauty products.
Lash Strengthening
Lash serums can help your natural hair grow back faster. Look for serums with peptides or biotin in the formula. Castor oil is a natural way to thicken up lashes. Apply a tiny bit with a spoolie before bed.
Diet and Supplements
Eating a healthy diet helps your hair grow from within. Biotin supplements are great for hair and nail health. Drink plenty of water to keep your skin very hydrated. Your lashes will reflect your overall health and wellness.
Cleaning and Reusing False Lashes
If you love your lashes, you can probably wear them again. Cleaning them properly is the only way to stay safe. It saves you money and keeps your favorite styles handy. Follow these steps to keep them looking brand new.
Assessing Condition
Check if the lash band is still straight and firm. If the hairs are falling out, toss them away. Look for any permanent kinks in the lash fibers. High-quality lashes can often be worn up to twenty times.
Disinfecting
- Soak them in 70% isopropyl alcohol for two minutes.
- Kill bacteria that may have built up during your wear.
- Don’t leave them in too long or they might melt.
- Rinse gently with cool water after the alcohol soak.
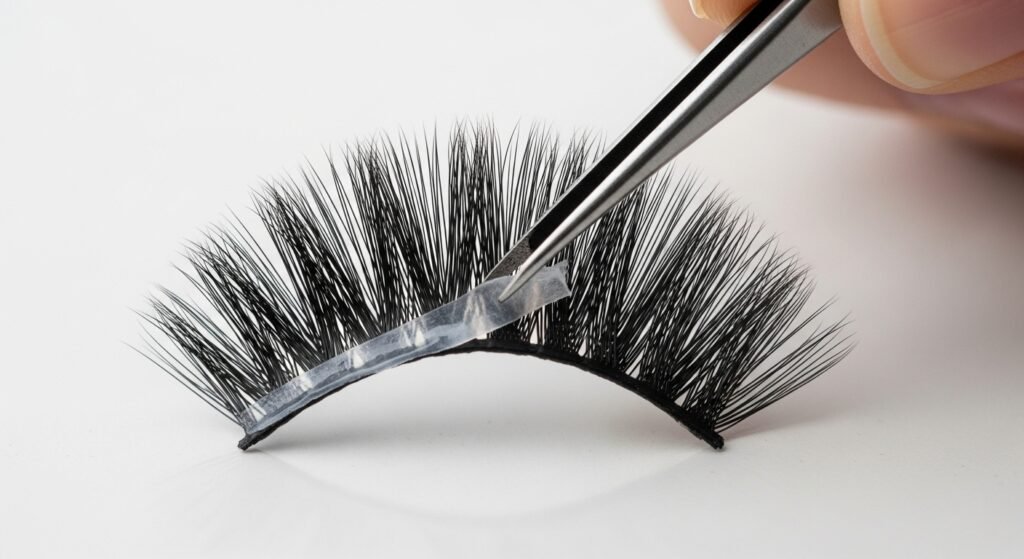
Glue Removal for Storage
Use a pair of tweezers to peel glue off the band. It should come off in one long, stretchy string. A lip wand can help rub off tiny stubborn bits. Be careful not to pull the actual lash hairs.
Preserving the Curl
Lay your lashes on a clean paper towel to dry. Don’t use a hair dryer or you will ruin them. You can use a spoolie to brush them into shape. This keeps them looking fluffy and very natural.
Storage Tips
Put your lashes back into the original plastic tray. This helps them keep that perfect “C” or “D” curl. Keep the lid on to prevent dust from settling. Store them in a cool, dry place like a drawer.
Troubleshooting Difficult Removal Scenarios
Sometimes things don’t go exactly according to the main plan. You might run into extra-strength glue or sensitive skin issues. These tips help you navigate the tricky situations with ease. Don’t panic if things feel a little bit difficult at first.
Removing Waterproof Lash Glue
Waterproof glue is made to resist almost every single liquid. You must use a heavy, oil-based remover for this stuff. Let the product sit for twice as long as normal. Steam is almost always required for waterproof removal jobs.
Old Glue vs. Fresh Glue
Old glue becomes brittle and can be very hard to move. Fresh glue is still gummy and might smear a bit. Knowing how long you’ve worn them helps you pick tools. Be extra patient with lashes you’ve worn for weeks.
Dealing with Allergic Reactions
If your lids get puffy, you might have an allergy. Take off the lashes as fast as you safely can. Use an over-the-counter cream if your doctor says it’s okay. Stop using that specific brand of glue forever.
What to do if Remover Gets Inside the Eye
If liquid gets in, do not rub your eye area. Use a saline solution or tap water to rinse out. Keep rinsing until the stinging sensation is totally gone. If your vision stays blurry, call an eye doctor.
Conclusion
Mastering the art of removing eyelash glue is an essential skill that ensures your beauty routine remains both glamorous and safe for your long-term eye health. By prioritizing patience and using the right solvents—whether you opt for professional-grade bond breakers, natural household oils, or the gentle power of steam—you can effectively dissolve even the most stubborn adhesives without sacrificing your natural lashes. Remember that the secret to a successful removal lies in the “never pull” rule and a dedicated post-removal care routine that hydrates the delicate skin around your eyes. Taking these extra steps not only protects your current lash line from damage like traction alopecia but also creates a healthy foundation for your next stunning lash application.
| Removal Method | Required Tools / Ingredients | How to Use | Key Benefits |
| Professional Dissolver | Gel or liquid bond breaker, micro-brushes, spoolie | Apply the gel to the lash line with a micro-brush, wait 3–5 minutes, and gently wiggle lashes off with a spoolie. | Fastest method; specifically designed for medical-grade adhesives; highest success rate for extensions. |
| Oil-Based Cleanser | Oil-based makeup remover or cleansing balm, cotton pads | Soak a cotton pad and hold it over the eyes for 60 seconds, then wipe downward gently until the glue dissolves. | Very easy to find; multi-tasks by removing other eye makeup; gentle on the skin barrier. |
| Natural Oils | Coconut, Olive, or Baby oil, cotton swabs | Saturate the lash line with the oil using a swab, let sit for 10 minutes, and slide the lashes off once the bond softens. | Extremely affordable; chemical-free and non-irritating; provides deep hydration to natural lashes. |
| Steam Method | Bowl of hot water, large towel, optional essential oils | Lean over the steaming bowl with a towel over your head for 10–15 minutes to loosen the adhesive bonds. | Relaxing and spa-like; zero chemical exposure; softens the toughest glue before using other methods. |
| Petroleum Jelly | Vaseline, cotton swab, clean cloth | Dab a small amount of Vaseline onto the specific glue residue, wait 5 minutes, and wipe away with a clean cloth. | Best for removing stubborn residue left on the skin; very thick consistency stays exactly where applied. |
| Micellar Water | Oil-infused micellar water, cotton pads, Q-tips | Use a soaked Q-tip to detail the lash line after the main removal to pick up tiny leftover adhesive flakes. | Lightweight and non-greasy; great for sensitive eyes; leaves the skin feeling fresh and clean. |
| Professional Cleaning | 70% Alcohol, lip wands, lash tray | Soak the removed false lashes in alcohol for 2 minutes and rub away the band glue with a lip wand. | Disinfects lashes for safe reuse; extends the life of your favorite lash styles; saves money over time. |
Frequently Asked Questions (FAQs)
How long should I wait between lash applications?
It is best to wait at least 24 to 48 hours. This gives your natural lashes time to breathe and recover.
Can I use water to remove eyelash glue?
No, water alone will not break down most lash glues. You need an oil or a solvent to dissolve it.
Is it normal for a few natural lashes to fall out during removal?
Yes, it is normal as long as it’s only a few. Your lashes shed naturally as part of their growth cycle.
What is the fastest way to remove professional extensions at home?
A gel-based professional remover is the quickest way to work. It is specifically made to melt strong adhesive bonds fast.
Can I use lash remover while wearing contact lenses?
Always take your contacts out before you start the removal. The oils and chemicals can ruin your expensive lenses.
Will removing my lashes every night make my natural lashes thinner?
Not if you do it gently and use the right tools. Rough removal is what actually causes the hair thinning.
Can I use rubbing alcohol to remove eyelash glue?
No, you should never use rubbing alcohol near your eyes. It is extremely drying and can cause severe chemical burns to the delicate skin of your eyelids. If it gets inside your eye, it can damage your cornea.
Is it safe to use dish soap for removing lash adhesive?
Dish soap is formulated to strip grease from plates and is too harsh for your face. It can lead to extreme dryness and irritation. Stick to products specifically designed for skin or natural oils.
Why does my lash glue turn white during removal?
When certain adhesives come into contact with moisture or specific removers, they undergo a process called shock polymerization. This turns the glue into a hard, white crust. If this happens, apply more oil or gel remover to soften it back up.
Can I remove eyelash glue while wearing my contacts?
You should always take your contact lenses out before starting any removal process. The oils and solvents can get trapped behind the lens or cause the lens material to cloud up and warp.
Does sweat make eyelash glue come off faster?
While sweat contains salt and moisture that can slightly weaken the bond over time, it is not an effective removal method. Relying on sweat will likely just lead to itchy eyes and clogged pores.
What should I do if I accidentally pull out a natural lash?
Do not panic, as one or two lashes will not cause a noticeable gap. Keep the area clean and apply a lash growth serum to encourage the follicle to start a new growth cycle immediately.
Can I use hair conditioner to slide off false lashes?
Hair conditioner has some emollient properties that might loosen strip lash glue, but it is not recommended for professional extension glue. Many conditioners contain perfumes that sting if they seep into your eyes.
How do I know if I am allergic to the lash remover?
Signs of an allergic reaction include intense itching, sudden swelling of the lid, or a rash. If you notice these symptoms during your patch test on your wrist, do not put the product near your eyes.
Is it okay to use a hairdryer to speed up the steaming process?
Never point a hairdryer at your eyes to create heat. The direct hot air can dry out your eyeballs and burn your skin. Stick to the bowl of hot water method for a safe, consistent steam.
Can I use waterproof mascara over my extensions to hide old glue?
Adding waterproof mascara to old extensions makes the removal process twice as hard. The mascara binds with the adhesive and creates a thick, gunked-up mess that is very difficult to dissolve.
Why is my vision blurry after using oil to remove my lashes?
This is usually just because a tiny bit of oil has gotten onto the surface of your eye. It is not permanent. Simply rinse your eyes with lukewarm water or use a few hydrating eye drops to clear it up.
How can I remove glue from my bottom lashes without hitting the top ones?
Use a very small micro-brush or a toothpick-sized cotton swab. Place a small piece of medical tape or a gel pad over your top lashes to keep them out of the way while you work on the bottom.
Does eyelash glue remover have an expiration date?
Yes, most professional removers lose their potency after six to twelve months. If your remover has changed color, gotten lumpy, or smells strange, it is time to throw it away and buy a fresh bottle.
Can I use a sauna instead of a steam bowl at home?
A sauna works perfectly for loosening lash glue because it provides a consistent, high-humidity environment. Just be sure to follow up with an oil-based cleanser immediately after you exit the sauna.
Why does the glue feel sticky even after I used remover?
This means the adhesive has been softened but not completely wiped away. You need to use a fresh cotton swab dipped in more remover or oil to physically lift those sticky particles off the skin.
Will crying help remove my eyelash extensions?
Tears are slightly salty, which can weaken glue over time, but crying is not a reliable removal method. It usually just leads to puffy eyes and makes the glue more difficult to see and target.
Can I use olive oil from my kitchen to remove lashes?
Yes, extra virgin olive oil is a fantastic and safe natural alternative for removing lash glue. It is heavy enough to penetrate the adhesive and is very nourishing for the skin.
How long does it take for natural lashes to grow back?
If a lash is pulled out, it typically takes between six and eight weeks to fully grow back. Using a lash serum can sometimes speed up this transition phase of the growth cycle.
Is it safe to use tweezers to pick off the glue?
You can use tweezers to gently lift a lash that is already 95% detached. However, you should never use them to scrape glue directly off your eyelid skin, as you could easily pinch or cut yourself.
What is the best way to remove glue from mink lashes?
Mink lashes are delicate, so avoid soaking them directly in heavy oils if you want to reuse them. Use a Q-tip to target only the glue on the band rather than saturating the entire lash.