

The nano brows healing process is a journey to your dream eyebrows. This advanced technique uses a machine to create thin hair strokes. It is much gentler on your skin than old methods. You get a natural look that lasts a long time. Many people choose this because it heals so well. It helps you wake up ready to go every day.
Understanding Nano Brows and the Recovery Journey
Nano brows use a specialized tattoo machine with ultra-fine needles. This tool places pigment into the dermal layer of your skin. The precision is much higher than other semi-permanent makeup. It creates realistic strokes that look like real hair. Most people love how soft and clean the results look. It is a great choice for many skin types.
What are Nano Brows
Nano brows are a form of permanent makeup for your eyebrows. An artist uses a machine to draw tiny lines. These lines mimic the look of natural brow hairs. The pigment is high quality and safe for your skin. It is a top choice for eyebrow enhancement today. You get a look that fits your unique facial features.
Why the Healing Process Matters
How you heal determines how your brows look in the end. Proper recovery ensures the pigment stays where it should. If you ignore the rules, your brows might fade too fast. Your skin needs time to seal the ink inside. Following the nano brows healing process protects your investment. It also keeps your skin healthy and happy.
Nano Brows vs. Microblading Healing
Nano brows are often better for your skin than microblading. Microblading uses a manual blade to cut the skin. The nano machine causes much less trauma. This means you see less redness and swelling. Most clients find the nano brows healing process much easier. It is a smoother ride from start to finish.
The Science of Pigment Implantation
The machine places ink into the upper part of the dermis. This layer holds the pigment better than the surface skin. Because the needle is so small, it causes tiny dots. These dots form a solid-looking line that stays crisp. Your body treats the pigment as a part of you. This science is what makes the results look so real.
Pre-Procedure Preparation: Setting the Stage for Healing
You should prepare your skin before you even get to the studio. Good prep leads to a better nano brows healing process. It helps the pigment go in easily and stay there. You want your skin to be in top shape. A little planning goes a long way for your brows.
The 48-Hour Rule
You must avoid certain things right before your appointment. This keeps your blood from getting too thin.
- Avoid alcohol because it can cause more bleeding.
- Skip caffeine to keep your blood pressure steady.
- Stop blood thinners like aspirin if your doctor says it is okay.
- Don’t take ibuprofen as it can increase bruising.
Skin Condition Matters
Your skin needs to be calm and healthy for the procedure. Avoid harsh treatments like chemical peels for at least two weeks. Do not get Botox near your brows for a month. Sunburned skin cannot be worked on at all. Make sure you have no breakouts in the brow area. Clean and settled skin is the best canvas.
Hydration and Nutrition
Drink plenty of water in the days leading up to your session. Hydrated skin heals much faster and looks better. Eat healthy meals to support your immune system. Your body needs energy to repair the skin. Good nutrition helps you stay comfortable during the session. It sets you up for a winning recovery.
Consultation and Patch Testing
Talk to your technician about any allergies you have. A patch test can check for a reaction to the pigment. This step ensures your safety during the nano brows healing process. Ask all your questions during the consultation. Your artist will help you choose the right shape. This builds trust and ensures you love your look.
Immediate Post-Procedure Care: The First 24 Hours
The first day is the most important for your new brows. Your skin is open and very sensitive right now. You must be extra careful to keep them clean. This prevents bacteria from getting into the skin. Follow your artist’s instructions to the letter.
The Sterilization Phase
You need to keep the area sterile and safe. Do not touch your brows with dirty fingers. Keep your hair away from your face. Change your pillowcase to a clean one tonight. Avoid dusty or dirty places while your skin is open. This is the best way to prevent an infection.
Managing Lymph Fluid
Your skin might leak a clear fluid called lymph. You must gently blot this away with a clean cloth.
- Use a lint-free cloth to tap the area softly.
- Do not rub the brows at all.
- Check every hour to see if more fluid appears.
- Prevent scabs by keeping the fluid from drying on top.
Initial Appearance
Your brows will look very dark and bold today. They might even look a bit thicker than you expected. This is normal and happens to everyone. The pigment is sitting on top of the skin too. Do not panic if they look like “blocks” of color. They will shrink and lighten as you heal.
Physical Sensations
It is normal to feel some tenderness or stinging. You might see some redness around the edges. Minor swelling is also common on the first day. These feelings should start to fade very quickly. If you feel okay, you can go about your day. Just remember to take it easy on your face.
Immediate Restrictions
There are a few things you must not do today.
- Keep them dry and avoid any water on your face.
- No exercise because sweat can ruin the pigment.
- Don’t apply makeup anywhere near your eyebrows.
- Avoid touching or picking at the area at all.
The Daily Aftercare Routine and Maintenance
A good routine makes the nano brows healing process easy. You need to be consistent every single day. Small steps keep your brows looking their best. It only takes a few minutes each morning and night. This care pays off with beautiful, lasting results.
Gentle Cleansing Protocols
You will likely start cleaning your brows on the second day. Use a very mild, fragrance-free cleanser. Splash your face gently with lukewarm water. Use your clean fingertips to wash the brows softly. Rinse them carefully so no soap is left behind. This removes bacteria and old ointment.
Drying Techniques
How you dry your brows is very important. Never use a regular bath towel because it has bacteria. Use a fresh, lint-free cloth or a clean paper towel.
- Pat the area gently until all water is gone.
- Never rub or scrub the skin.
- Ensure they are dry before you put on any balm.
- Be patient and move slowly around the brow area.
Ointment Application
Your artist will give you a specific healing balm. You only need a tiny bit, like a grain of rice. Use a clean cotton swab to apply it to each brow. It should look like a very thin, shiny layer. Too much ointment can suffocate the skin and cause issues. Just enough keeps the skin from getting too dry.
Maintaining Hygiene
Always wash your hands before you touch your face. Keep your hair pulled back while you do your routine. Use a fresh cotton swab for every application of balm. Don’t let anyone else touch your healing brows. Keeping things clean is the best way to stay safe. Your skin will thank you for being so careful.
The “Wet” vs. “Dry” Healing Debate
Some artists want you to keep brows dry for a week. Others suggest washing them gently every day. Nano brows often do well with a moist healing approach. This means light cleaning and a tiny bit of balm. Follow the specific guide your own artist gave you. They know what works best for their specific technique.
Day-by-Day Healing Timeline: What to Expect
The nano brows healing process follows a specific timeline. Knowing what comes next helps you stay calm. Every person heals at a slightly different speed. Most people follow the same general stages of recovery. It usually takes about a month to see the final look.
Days 1 to 3: The Dark and Bold Phase

The color stays very strong during these first few days. You might feel like they are “too much” for your face. The skin is starting to close up the tiny holes.
- Color stays dark as the pigment oxidizes.
- Swelling goes down and redness starts to vanish.
- Tightness may be felt as the skin begins to heal.
- No sweat is still the most important rule.
Days 4 to 7: The Scabbing and Flaking Stage
This is the part where your brows might look a bit messy. The top layer of skin is ready to come off. You might see tiny flakes or very thin scabs.
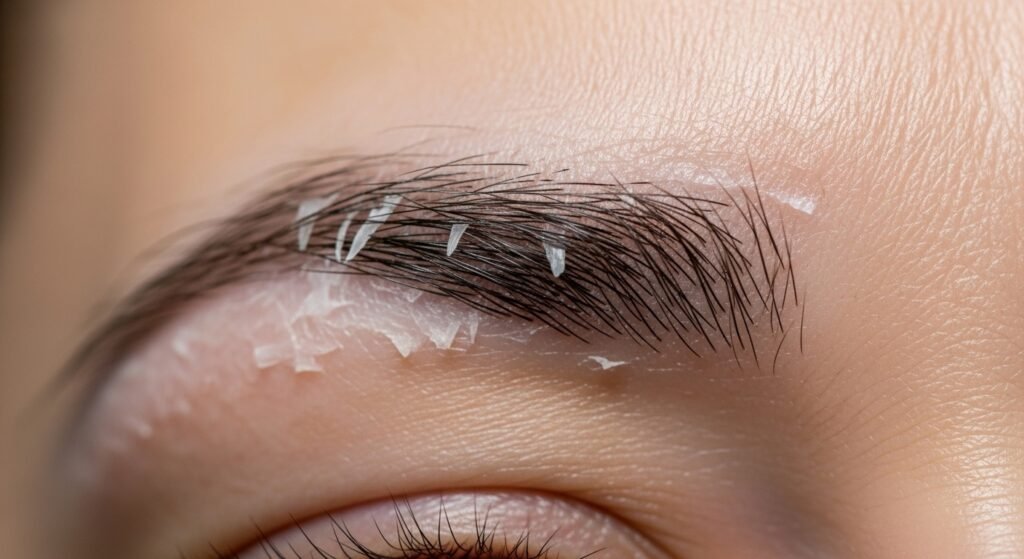
- Flaking starts and may look like dry skin.
- Brows look patchy as some parts shed faster than others.
- Do not pick or pull any of the skin off.
- Be gentle when you wash and dry the area.
Days 8 to 14: The Itching and Lightening Phase
Your brows might start to feel very itchy now. This is a great sign that your skin is regenerating. The color will also look much lighter than before.

- The “Ghosting” effect makes it look like the ink is gone.
- Itching is normal but you must not scratch.
- New skin is growing over the pigment.
- Keep it clean and follow your balm routine.
Days 15 to 30: Color Stabilization and Resurfacing
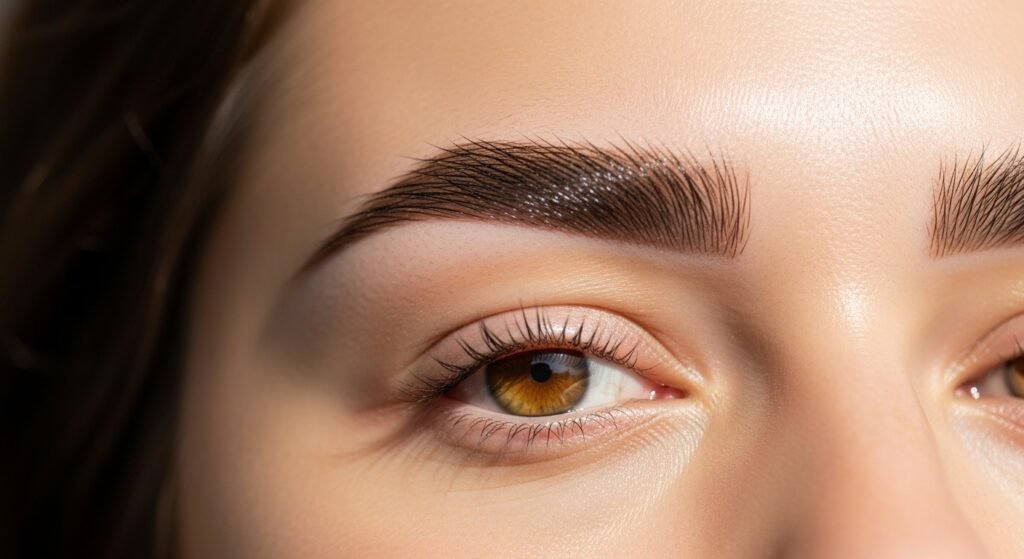
The “ghost” phase ends and the color comes back. Your skin is getting stronger every day. You will start to see the real shape and shade.
- Color “blooms” and looks more natural.
- Texture settles back to how your skin usually feels.
- Final results start to show their true beauty.
- Symmetry check allows you to see what needs a touch-up.
Essential Restrictions and Prohibited Activities
To protect your nano brows healing process, avoid these hazards. Many common things can harm your new brows. Staying away from them ensures the ink stays put. It is only for a few weeks, so hang in there. Your beautiful brows are worth the wait.
Water and Moisture Exposure
Too much water is bad for healing brows. It can soften the scabs and pull out the pigment.
- No swimming in pools, lakes, or oceans.
- Avoid hot tubs and saunas for two weeks.
- Skip long showers with lots of steam.
- Wash your hair carefully to keep brows dry.
Skincare Hazards
Many products you use daily are too strong for healing skin. They can bleach or fade the pigment very quickly.
- No Retinols or anti-aging creams near the brows.
- Avoid AHAs and BHAs in your cleansers.
- Skip Vitamin C serums on your forehead.
- No chemical peels or harsh exfoliants.
Makeup and Cosmetics
Do not put any makeup on your brows for 10 to 14 days. It can lead to infection or block the healing skin. Avoid using foundation or powder too close to them. When you do start using makeup again, use clean brushes. It is best to wait until all flaking has stopped.
Environmental Factors
The world around you can affect your healing. Avoid direct sunlight as it is the biggest enemy of pigment. Wear a hat if you have to go outside. Avoid very dusty or windy places. If you live in a very humid place, stay in the AC. These steps keep your skin calm and protected.
Lifestyle Adjustments
You might need to change your habits for a little while. Try to sleep on your back so you don’t rub your brows on the pillow. Avoid heavy cleaning or gardening where dirt can fly. Don’t get any facial massages or other spa treatments. Keeping your lifestyle “clean” helps your body focus on healing.
Sweat Management
Sweat contains salt which can be very harsh. It can actually “push” the ink out of your skin. Avoid the gym and heavy lifting for at least a week. If you do get a little sweaty, blot it off immediately. Keeping the area cool and dry is a top priority.
Factors Influencing Your Healing Success
Everyone’s nano brows healing process is unique. Your body and your environment play a big role. Some people heal in record time. Others might need a little more patience. Knowing these factors helps you manage your expectations.
Skin Type
Your skin type changes how the pigment settles. Oily skin might see slightly softer lines over time. Dry skin often holds onto the crisp strokes very well. Combination skin might heal differently in different spots. Your artist will adjust their technique based on your skin.
Age and Metabolism
Younger skin often heals faster because of high cell turnover. However, a very fast metabolism can also fade pigment quicker. Mature skin is thinner and needs a very gentle touch. It may take a few extra days for older skin to fully close. Both can have great results with the right care.
Immune System Health
A strong immune system helps your skin repair itself. If you are sick, your body might take longer to heal your brows. Chronic conditions can also slow down the process. Try to get plenty of rest after your appointment. Being healthy on the inside shows on the outside.
Adherence to Instructions
The biggest factor you can control is your aftercare. Those who follow every rule usually have the best results. Skipping steps can lead to patchiness or fading. Your artist gave you those rules for a reason. Trust the process and stay diligent.
Climate and Environment
Very hot and humid weather can make it hard to stay dry. Cold, dry air can make your skin flake more. If it is very sunny, you have to be extra careful with hats. Adjust your indoor environment to be comfortable. A steady temperature is best for your skin.
The Role of the Touch-Up Session
The touch-up is the second half of the procedure. It is not just an “extra” step. Most people need it to get the perfect look. It completes the nano brows healing process. Think of the first session as the base and the second as the polish.
Timing
You should wait 4 to 6 weeks for your touch-up. This gives your skin enough time to fully heal deep down. If you go too soon, you might damage the skin. Your artist needs to see the final settled color first. Patience here leads to much better results.
Purpose of the Follow-Up
Your artist will look at how your skin held the ink. They can fill in any spots that faded during the “ghosting” phase.
- Deepen the color if it healed too light.
- Refine the shape to make it perfect.
- Add more density for a fuller look.
- Ensure symmetry between both brows.
The Second Healing Phase
The good news is the second healing is usually easier. Your skin already knows what to do. There is often less work done, so there is less trauma. You still need to follow all the aftercare rules again. It will go by much faster this time around.
Finalization
After the touch-up heals, your brows are officially done. This is the look that will last you for a long time. You can finally see the full power of nano brows. No more drawing them on every morning. You are ready to enjoy your new, beautiful face.
Long-Term Maintenance and Pigment Preservation
Once you are healed, you want to keep them looking fresh. Nano brows can last 1 to 3 years. How you treat them every day matters. A few simple habits will keep the color bright. It is easy to protect your new look.

UV Protection
The sun is the number one cause of fading. Once your brows are fully healed, use sunscreen every day.
- Apply SPF 30+ directly on the brows.
- Reapply if you are staying outside.
- Wear sunglasses and hats for extra shade.
- Avoid tanning beds which can change the pigment color.
Routine Skincare
Continue to keep harsh acids away from your eyebrows. When you use exfoliants, stop at the brow bone. Be careful with strong facial treatments at the spa. Tell your facialist that you have permanent makeup. This keeps them from using products that might cause fading.
Longevity Expectations
Your brows will slowly fade over the years. This is normal for semi-permanent makeup. Most people get a “color boost” once a year. This keeps the shape crisp and the color rich. Your lifestyle and skin type will determine your specific timeline.
The Impact of Laser Treatments
If you get laser hair removal or skin resurfacing, be careful. Lasers can sometimes hit the brow pigment and change it. Always wear protective goggles or covers. Inform the technician exactly where your nano brows are. Safety first will save your beautiful eyebrows.
Recognizing Complications vs. Normal Healing
Most people heal without any problems. However, you should know what to watch for. Knowing the difference between “healing” and “trouble” is key. It helps you stay calm and act fast if needed. Your artist is always there to help you.
Signs of Infection
An infection is rare but serious. Watch for these specific warning signs.
- Spreading redness that gets worse after day 3.
- Extreme swelling that doesn’t go down.
- Yellow or green pus coming from the area.
- Fever or chills which mean your body is fighting something.
- Intense pain that feels like it’s burning.
Normal Side Effects
Many things that look scary are actually fine. Flaking and peeling are totally normal parts of the process. Temporary fading (ghosting) happens to almost everyone. Mild itching is a sign of good repair. Slight color changes in the first week are also expected.
Allergic Reactions
Some people might be sensitive to the balm or pigment. This usually looks like a bumpy red rash. It might be very itchy but without the pain of an infection. If you think this is happening, stop using the balm. Contact your artist to see if they have a different suggestion.
Communication with Your Artist
If you are worried, send a photo to your technician. They have seen hundreds of people heal. They can tell you if what you see is normal. Do not try to fix things yourself with random creams. Always get professional advice before taking action.
Troubleshooting Common Healing Concerns
Sometimes things don’t go perfectly, and that is okay. Most small issues are easy to fix. Stay calm and follow these tips for common problems. Your brows are very resilient.
What to Do if You Accidentally Wet Your Brows
If you get them wet, don’t panic. Immediately take a clean, dry cloth. Gently pat the water away until they are dry again. Do not rub them at all. Skip the balm for a few hours to let the skin breathe. Most of the time, a little water won’t ruin everything.
Dealing with Uneven Fading
It is very common for one brow to heal differently. You might sleep on one side more than the other. Or one side might have had more lymph fluid. Don’t worry about the asymmetry during the first month. This is exactly what the touch-up session is for.
Managing Unexpected Redness
If you get red after a few days, you might be touching them too much. Try to leave them completely alone for 24 hours. Make sure you aren’t using too much ointment. If it doesn’t go away, check with your artist. Usually, some rest is all the skin needs.
Correcting Color Shifts
Sometimes pigment looks a little blue or orange at first. This is because it is shining through healing skin. As the skin thickens, the color will normalize. Your artist can also adjust the tone at your touch-up. Trust that the final color is still on its way.
Conclusion: Embracing the Transformation
The nano brows healing process is a path to lasting beauty. It takes a little work, but it is so worth it. You are giving yourself the gift of time and confidence. Soon, you will have the perfect brows you’ve always wanted.
Summary of the Journey
The first week is the hardest, but it goes by fast. Remember that bold colors and flakes are just steps in the plan. By week four, you will be in love with your look. Following the rules is the key to your success. You’ve got this.
Final Results
Your new brows will look soft, natural, and beautiful. They frame your face and make your eyes pop. No more smudging or fading throughout the day. It is a life-changing beauty boost. You can feel proud of your investment.
Next Steps
Make sure your touch-up is on the calendar. Start looking for a good daily sunscreen you like. Take “after” photos to see how far you’ve come. Most importantly, enjoy your gorgeous new nano brows.
| Phase | Timeframe | Key Actions & What to Expect |
| Pre-Preparation | 2-4 Weeks Before | Avoid Botox, chemical peels, laser treatments, or tanning in the brow area. |
| Pre-Preparation | 48 Hours Before | Stop alcohol, caffeine, and blood thinners (like aspirin or ibuprofen) to minimize bleeding. |
| Pre-Preparation | 24 Hours Before | Hydrate well and ensure the skin around the brows is clean and free of breakouts. |
| Stage 1: The Procedure | Day 1 | Brows look dark, bold, and thick. Minor swelling and redness are normal. |
| Stage 1: Initial Care | Day 1 (Hourly) | Gently blot lymph fluid with a lint-free cloth to prevent heavy scabbing. |
| Stage 2: Darkening | Days 2–3 | Pigment oxidizes and looks even darker. Skin feels tight; begin gentle cleaning. |
| Stage 3: Peeling | Days 4–7 | Flaking and scabbing begins. Brows look patchy. Do not pick at the skin. |
| Stage 4: Ghosting | Days 8–14 | Scabs fall off. Brows look very light or “missing” as new skin grows over ink. |
| Stage 5: Blooming | Days 15–30 | The “Ghosting” ends. The true color resurfaces and the skin texture normalizes. |
| Stage 6: Refinement | Weeks 4–8 | Touch-up session is performed to perfect shape and fill any faded spots. |
| Long-Term Care | Ongoing | Apply daily sunscreen (SPF 30+) to prevent UV fading once fully healed. |
Frequently Asked Questions About Nano Brows
Can I get Nano Brows if I am pregnant or breastfeeding?
Most professional artists will not perform the procedure during pregnancy or while breastfeeding. This is due to the risk of infection and the lack of research on how tattoo pigments affect a developing baby. Additionally, hormonal changes during this time can significantly alter your skin’s pigment retention and healing response.
Is it safe to get Nano Brows if I have a history of keloid scarring?
If you are prone to keloids, you should consult with a dermatologist before booking. While the Nano technique is much gentler than microblading, any trauma to the skin carries a risk of triggering a keloid. A patch test on a small, discreet area of skin is often recommended to see how your body reacts.
Will the procedure affect my natural brow hair growth?
The nano brows healing process does not damage your natural hair follicles. In fact, the stimulation of the skin can sometimes encourage blood flow to the area. Your natural hair will continue to grow as usual, though you will still need to tweeze or wax stray hairs that fall outside your new shape.
Can I drink coffee or tea on the morning of my appointment?
It is best to avoid caffeine entirely on the day of your procedure. Caffeine is a stimulant that can increase your heart rate and thin your blood. This leads to more bleeding during the process, which makes it harder for the artist to see their work and can result in poorer pigment retention.
How do I shower without getting my new brows wet?
The best method is to take lukewarm baths instead of showers to avoid steam. If you must shower, keep your face away from the stream and use a visor or a clean dry washcloth to protect the brow area. Avoid letting the water run directly over your forehead for at least the first ten days.
What should I do if I have an MRI scheduled shortly after my procedure?
Some tattoo pigments contain trace amounts of iron oxide, which can react during an MRI scan. Always inform the MRI technician that you have permanent makeup. You may feel a slight tingling or pulling sensation in the brow area during the scan, but this is usually manageable and temporary.
Can I use a sauna or steam room once the flaking has stopped?
Even if the visible flaking has ended, your skin is still healing internally. It is recommended to wait a full 30 days before exposing your face to intense heat or steam. Premature heat exposure can open the pores and cause the settling pigment to blur or fade before it is fully locked in.
Is it okay to go to the beach if I wear a very large hat?
While a hat provides great shade, the beach environment poses other risks like salt spray, wind-blown sand, and intense humidity. These factors can irritate the raw skin and introduce bacteria. It is safest to avoid beach trips for the first two weeks of the nano brows healing process.
How long should I wait to get a facial after my session?
You should wait at least four to six weeks before getting a professional facial. This ensures the skin is completely closed and the pigment has settled deep in the dermis. Always remind your esthetician to avoid any heavy exfoliation or steaming near the brow area during future appointments.
Can I take ibuprofen or aspirin if I feel pain after the procedure?
It is better to use Tylenol (acetaminophen) for discomfort. Ibuprofen and aspirin are blood thinners and can cause increased bruising or bleeding in the early stages of healing. If the pain is severe, contact your artist immediately to ensure there is no underlying complication.
What happens if I have an oily T-zone?
Oily skin can sometimes cause the nano strokes to heal a bit softer or more “powdered” than on dry skin. You may need to use a more frequent blotting routine during the first 24 hours to prevent oil buildup from pushing out the pigment. Your touch-up session will be vital for darkening any spots that didn’t take.
Does the pigment change color as it fades over the years?
High-quality modern pigments are designed to fade true to tone, meaning they simply get lighter over time. However, factors like heavy sun exposure or certain medications can occasionally cause the color to shift toward a cooler gray or a warmer orange. Annual color boosts prevent this from happening.
Can I get Nano Brows if I have active eczema or psoriasis?
You cannot have the procedure done if you have an active flare-up of eczema, psoriasis, or dermatitis directly on the brow area. The skin must be calm and healthy for the pigment to implant correctly. Wait until your skin has fully cleared before scheduling your appointment.
Should I stop using my lash growth serum during the healing process?
While lash serums are used on the eyelids, they often contain prostaglandins that increase blood flow to the entire eye area. To be safe, many artists suggest pausing lash serums for a week before and two weeks after the procedure to minimize sensitivity and bleeding.
Is it normal for my brows to look uneven during the second week?
Yes, this is very common and is often referred to as the “patchy” stage. One brow may flake faster than the other, or one may “ghost” more intensely. Do not judge the symmetry or the final color until you have reached the full 30-day mark.
Can I fly on a plane immediately after my appointment?
You can fly, but be aware that airplane air is extremely dry. This can make your healing skin feel very tight and uncomfortable. Ensure you have your recommended aftercare balm in your carry-on and apply it as directed to keep the skin from cracking during the flight.
How do I sleep without rubbing my brows on the pillow?
Try to sleep on your back for at least the first ten days. If you are a side sleeper, you can use a travel U-shaped pillow to help keep your head centered. Using a silk or satin pillowcase can also reduce friction if you happen to roll over during the night.
Can I use Vaseline instead of the artist’s recommended balm?
You should avoid using 100% petroleum jelly products like Vaseline unless specifically told otherwise. These products are “occlusive,” meaning they create a total seal that doesn’t allow the skin to breathe. This can trap heat and bacteria, potentially leading to an infection or poor healing.
What should I do if I get a pimple inside my eyebrow while healing?
Do not pop or squeeze the pimple, as this can cause the pigment to move or lead to a permanent scar. Gently clean the area as part of your normal routine and let the blemish heal on its own. If it persists, ask your artist for advice on a pigment-safe spot treatment.
Will my brows look “fake” during the healing process?
During the first few days, they will look very defined and dark, which can feel “fake” if you are used to having very light brows. However, once the flaking ends and the color softens, the machine-hair strokes look incredibly natural. The “intense” look is only a temporary part of the journey.